Wonderful Chaos of Fall

Ahh, October. The lovely time of year where the chill starts to creep into the air and flights of fancy dance around the coming holidays. It’s the time of year where you discover that $20 you “lost” in your sweater pocket, that your boots really should have been replaced last year, and that the easy Halloween costume your kid swore they would wear this year has been replaced with “the most amazing” (read: complicated) idea.

This year, we were going to have random princess warriors and ninja warriors using the costumes of years past for Halloween. Last night I was given the rude awakening that instead this year’s creativity would revolve around a Fire Queen/Demon, Poison Ivy (the good one), and a Blue Zombie. First of all, what??? When did Poison Ivy go good? I must have missed that particular phase in the comic books. Nonetheless, it perfectly matches with my blooming botanist. The Fire Queen theme also aligns fairly well with the metamorphosis my oldest has been pushing through. Double digits are coming quickly for this young lady, and she is taking her growing up head on. The Blue Zombie really found me dumbstruck. This kid has been wanting to be a Red Ninja ever since his sister gave him the costume for his birthday. Alas, I think this one might actually be the easiest.

We spent most of the evening looking through pictures of what each costume might entail.

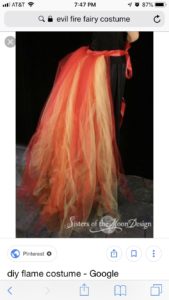
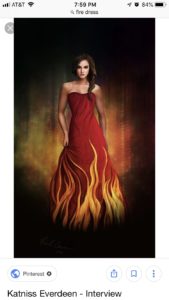
The Fire Queen images we found that we liked the most were these. Absolutely stunning! One day, when I grow up, I’m going to be able to sew like this!

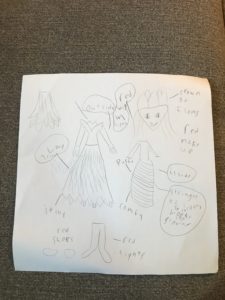
Then she drew her own ideas for the costume. Big ideas here! Notice the strings placed underneath the skirt and in the red wig to look like she is on fire. Also, the emphasis that there needs to be a comfy part of the skirt on the inside, because the tulle is itchy. I don’t blame her; it really is itchy. Finish off the costume with a crown of flames and some red make up, and we’re golden…or at least on fire.

Poison Ivy, the good one, should be a little simpler. A bright green twirly dress, some green leggings, and a belt made of vines. This, I can do!

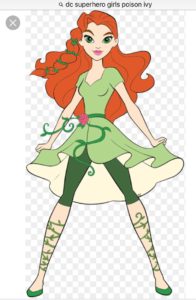
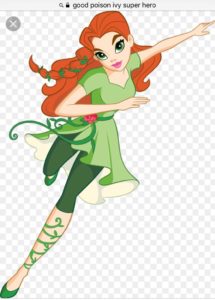
She also drew her own version of what the costume should look like. Note the emphasis on a twirly dress, with poof, of course. Tights, some slip on shoes, and “green all the way.”

I’m glad we recently got a Michael’s coupon in the mail. Now all I need is to find a couple for JoAnn’s Fabric. I’m pretty sure I can make the same twirly dress for both girls, one long and in red for the the Fire Queen; one shorter and in bright green for Miss Ivy. And making twirly dresses with a circle skirt pattern shouldn’t be too hard – fingers crossed of course! I wonder if I can find a bright red flat sheet for the dress. The kid is only 5’3″ so finding cloth long enough for her dresses is a pain in the tush.

The Blue Zombie is going to be a second hand store accomplishment. Find some blue jeans and a blue long sleeve shirt of some kind. Paint his face a lovely grey, and muss up his hair a little more than it usually is. See, the easy one!

What is in store for your Halloween costumes?


Beginnings of Baby Blanket #3

I am back to knitting Baby Blanket #3 now, albeit slightly distracted by reading. I have begun the self-doubt phase of the project by wondering whether I should really make all 6 squares out of two colors (light blue and dark blue) or make the squares out of all the colors, but then one color needs to be doubled. Decisions, decisions. This is why you should just stick with the pattern, except I’m too hard headed to do that. Smarter not harder doesn’t seem to apply to me and directions – whether it be cooking or arts and crafts.

There are 8 patterns of squares, so I will probably stick with making each pattern with 2 colors. But then I need to decided which 2 color schemes to duplicate. Ugh! I drive myself crazy trying to figure this crap out!

  • Light Blue/Dark Blue
  • Light Blue/Light Brown
  • Light Blue/Dark Brown
  • Dark Blue/Light Brown
  • Dark Blue/Dark Brown
  • Light Brown/Dark Brown

I have made the first 3 squares of the Garter Stitch Waves in my light blue color. I need to make them in the dark blue (or brown, or light brown, or hey let’s throw a purple in there somewhere… head, meet desk).

First of the garter stitch waves pattern

I also decided to add a set of squares to use up the variegated yarn I had purchased to go with the blue yarns. The blanket I was originally going to make was a mile-a-minute blanket, which uses variegated yarn in the middle, and then two separate colors for the border and connecting stitches. Not wanting to hold the yarn for another blanket, I looked up variegated yarn patterns. I discovered mind-blowing Entrelac patterns. I was stunned at the beautiful patterns, all using variegated yarn. I have to say, we are one creative society! I picked up this dishcloth pattern on Ravelry, written by Criminy Jickets, and immediately decided they needed to be included in the blanket as well.

Garterlac pattern using variegated yarn

This pattern is definitely worth the extra brain capacity it took to make it. Because of this pattern I have learned how to add a stitch by knitting in front and back of a single stitch, learned how to knit backwards, learned how/where to pick up stitches along the side of a piece, and became more comfortable with ripping out stitches. I’ve always been afraid of ripping out stitches for fear that a stitch would slip and I would wind up losing it in the pattern. Still a little afraid of that, actually. It is so much easier to do with crocheted work, in my opinion. But with this piece it was easier to find the stitches after tearing little bits out.

So far I have 3 garteralc swatches and 3 wave swatches. Next post will hopefully have the color dilemma solved, and a few more swatches made. Oh, and the next book I’m going to read is Moby Dick. What are you creating or reading?

Squirrel!

Last post I mentioned I was starting Baby Blanket #3. And then I fell off the blogging face of the earth. In reality I got distracted with The Minimalists’ newest challenge of deleting 1,000 photos in 11 days. You guys, I had over 17,000 photos! I still have many, many more to go, but this post gave me the confidence to sit down and just do a few at a time. I found it much easier to go through one month at a time. And once I started deleting by months, I stopped counting how many I actually deleted. I know I did more than just 1,000. You should do it, too! It’s incredible how many “just in case” photos we take, and really, we only need 1 or 2, not 10-20.

The Minimalists “Delete 1,000 Photos in 11 Days”

I also got distracted with the Great American Read being hosted by PBS. It is “a list of 100 best-loved books chosen by the American public and a panel of literary and publishing professionals” (PublishersWeekly, Jan 17, 2018). Of course, being the book lover I am, I had to compare it to my own reading history of books I love; create a checklist so that I could track the books I haven’t read yet (or, let’s be honest, want to read again); and dive down deep into the lovely waters literary imagination. You can find the original list of books here. When you take into account some of the series of books in the list, it becomes a much more daunting list, but still, such a fun activity to tackle. The first book I picked up to read is “Where the Red Fern Grows” by Wilson Rawls. I’m about half way through as of today. I figured I would go through all the books we already had before heading to the library for the ones we’re lacking.


While I have been distracted, I haven’t been fully lost. Next post will have the squares I have knitted in my spare (haha!) time


Knit Along

I finished my middle kiddo’s baby blanket this weekend.  I would normally add the word “finally” in that sentence, but a good friend of mine once told me that you complete it when you complete it. When you add the word “finally” you aren’t noticing the accomplishment. You’re putting the emphasis on time you weren’t completing the project, instead of the joy of accomplishment. And what joy there is in this accomplishment. Seeing the joy in her eyes as she picked out the trim, and then watched it come to life has been heartwarming. Now that it is finished, she is delighted to use it in all the wonderful ways a 7 year old can possibly use a blanket.

Now that it is finished, Baby Blanket #3 is ready to begin. I’ve always wanted to do a sampler type afghan, but never wanted to start until all the baby blankets were finished. Then, ding! The epiphany I had was to make Baby Blanket #3 be a sampler square afghan. Why I didn’t think of that sooner, I’m just going to blame it on mom brain and be happy that I did come up with it.

After searching for which patterns  I wanted I came across Martin Storey’s Mystery Afghan Knit-a-long. I already have yarn (not the yarn he uses, of course, that would be too easy), and the patterns he uses are not so difficult as to be daunting, and not too boring either.

Week 1 is Garter Stitch Waves. You can find the pattern here. I’m using Red Heart Yarn because it’s what I had already bought. I’m using two blues, two browns, and a variegated yarn. He doesn’t use variegated yarn in any of his squares, so I’m not really sure how I’m going to add that in, but I’m sure I will figure it out. As I finish each week I’ll post pictures and comments here. If you’re joining me, I’d love to see your work in the comments! Happy knitting!

Packing a Good Lunch

Now that school has been back in session for a weak, I am reminded of my least favorite part: packing a lunch the kiddos. Trying to guess which foods the kids will dislike the least in an attempt to pack them something healthy, delicious, and easy to eat – the ever elusive trifecta. Why they don’t like the same things at school that they do at home is beyond me. The other issue my kids like to create, is their distaste for sandwiches. Granted, I get sick of sandwiches, too, however, this year my middle kid has challenged herself to go the whole year without taking any for lunch. More power to you, kiddo!

Early in our school lunch making days I stopped packing my kids’ lunches for them. I was sick to death of throwing uneaten food into the compost because “insert eye-rolling reason here.” There was nothing more frustrating than having them try a food at a store and then having them snub it after you’d brought home the obligatory 50 pounds of it (thank you, Costco!). Plus the added stress of me making their lunch, on top of all the other things I needed to help them keep track of, was making me grumpy. So, I stopped. After giving them the option of making their own lunch, or getting the cheese and lunchmeat sandwich the school provides if a student forgets their lunch, they readily accepted the challenge.

Now my oldest is in 4th grade and is very adept at making lunch, but getting there took some teaching. We have a piece of paper on the fridge that has each food category needed for a healthy lunch. Each category has a list of examples that fall within that category. Having this piece of paper helps immensely in teaching them what foods fall in each category, creating an easy flow for them to make their own lunches, and helps cut down on the wasted foods. Plus it gets a little bit of word recognition in there, too. They are far more likely to actually eat the majority of the contents in their lunchboxes if they’re the ones to pack it. They’re not going to pack something they dislike, after all.

Knowing they’re following these general guidelines for a healthy lunch is a huge relief. It also provides longterm lessons about choosing healthy, well-rounded meals, and lets them be creative about what they can, and are willing, to eat. We let each kid pick their own items from each category, and voila, you’ve avoided having to make their lunch for them (albeit they still need a few gentle reminders about quantity, and staying focused), they’re learning valuable lessons, and the amount of wasted food is significantly decreased. A win-win-win all the way around.

Below I’ve included the list that my kids have used to pack their lunches, as well as some of their favorite combinations


Their favorite combinations are as follows:

  • Apple slices, nut butter, tomatoes, and granola bar
  • Hard boiled eggs, cereal, bell peppers, peaches
  • Tuna, crackers, cherries, sugar snap peas
  • Yogurt, berries, zucchini, rice sprinkled with cinnamon
  • Quinoa, pears, carrots, pretzels
  • Grapes, cucumbers, hummus, naan

Most of these items are kept on the lower shelves of the fridge and pantry so that they are easily accessible. I have the kids make their lunches either after dinner, or while I’m cooking dinner. That way they can use up any leftovers, or, if we’re having noodles or rice, they can get a little scoop before any sauce is mixed with it. Worst case scenario they have to make lunch in the morning and we’ll eat breakfast in the car on the way to school. They also have a separate cupboard for all of their lunch containers, so that they can easily make their own lunch with minimal help from us.

As our kids have gotten older, like most kids, their food quantities range from “constantly grazing” to “picky minimalist”. The amount of food they pack in their lunches has always been up to them, with a firm minimum of 1 serving from each category. If they’re eating more, they can certainly have more from each category, with a few exceptions from the grains category. We’re not going to let them head to school with 1 blueberry and a double serving of pretzels. They have a fairly decent idea of how hungry they get at school and will pack accordingly, especially as they get older. Putting minimums helps the younger ones as they start recognizing portion sizes.

Whatever you can do to make it easier for them to pack a healthy lunch, and keep yourself a sane parent, do it! You’re providing the healthy choices, they’re choosing how much of each they’re going to eat, and there is less wasted food and frustration.

An Essential Summer – Back to School

Today is the first day of school for my older kids. My youngest starts kindergarten next week. I always find it amusing to look back at my beginning-of-summer self. She has so many plans to keep the kids entertained in an educational way. She’s mapped out the city’s parks, made weekly lesson plans, and fantasized about the knowledge the kids will glean from their summertime fun. She has so much hope!

End-of-summer me is in awe that teachers of 25-30 beautiful minds can actually keep on schedule, both during the day and as the year progresses, engage the kids, and not have a head of patchy hair. End of summer me is eternally grateful that I am not a teacher, not a home schooler; and to those of you that are – you are magnificent! Kudos to you!

At the back to school picnic I asked one of the teachers how his summer was. “It was essential” he replied. If there is a more appropriate description of summer, I’m not aware of it. Essential to recharge and reintroduce yourself to the world. Essential to pause and reflect on the beauty of what surrounds us. Summer for teachers isn’t all a vacation. It is also planning sessions, education sessions, and  preparation for the onslaught of germs, questions, kids, and parents – also essential, but not as glamorous.

Summer is essential also, I believe, to serve as a reminder to all the parents what incredible beings our teachers are. To be the ones that inspire, build confidence, teach, and love, basically to be an additional parent, and not just to a few kids but to over 2 dozen kids, is a task few of us envy. Our teachers are an essential part of our children’s lives and they don’t receive nearly the gratitude that they deserve.

So if you are as grateful as I am that your children are starting school, don’t forget to thank their teachers. And if you can thank them monetarily, ask them if they have a classroom wish list that you can donate from, get them a certificate to an arts and crafts store, book store, coffee shop, or bring in “office” supplies, or a favorite bottle of wine (Apothic Red is our favorite) . Because, let’s face it – these people are incredible!