Now that school has been back in session for a weak, I am reminded of my least favorite part: packing a lunch the kiddos. Trying to guess which foods the kids will dislike the least in an attempt to pack them something healthy, delicious, and easy to eat – the ever elusive trifecta. Why they don’t like the same things at school that they do at home is beyond me. The other issue my kids like to create, is their distaste for sandwiches. Granted, I get sick of sandwiches, too, however, this year my middle kid has challenged herself to go the whole year without taking any for lunch. More power to you, kiddo!
Early in our school lunch making days I stopped packing my kids’ lunches for them. I was sick to death of throwing uneaten food into the compost because “insert eye-rolling reason here.” There was nothing more frustrating than having them try a food at a store and then having them snub it after you’d brought home the obligatory 50 pounds of it (thank you, Costco!). Plus the added stress of me making their lunch, on top of all the other things I needed to help them keep track of, was making me grumpy. So, I stopped. After giving them the option of making their own lunch, or getting the cheese and lunchmeat sandwich the school provides if a student forgets their lunch, they readily accepted the challenge.
Now my oldest is in 4th grade and is very adept at making lunch, but getting there took some teaching. We have a piece of paper on the fridge that has each food category needed for a healthy lunch. Each category has a list of examples that fall within that category. Having this piece of paper helps immensely in teaching them what foods fall in each category, creating an easy flow for them to make their own lunches, and helps cut down on the wasted foods. Plus it gets a little bit of word recognition in there, too. They are far more likely to actually eat the majority of the contents in their lunchboxes if they’re the ones to pack it. They’re not going to pack something they dislike, after all.
Knowing they’re following these general guidelines for a healthy lunch is a huge relief. It also provides longterm lessons about choosing healthy, well-rounded meals, and lets them be creative about what they can, and are willing, to eat. We let each kid pick their own items from each category, and voila, you’ve avoided having to make their lunch for them (albeit they still need a few gentle reminders about quantity, and staying focused), they’re learning valuable lessons, and the amount of wasted food is significantly decreased. A win-win-win all the way around.
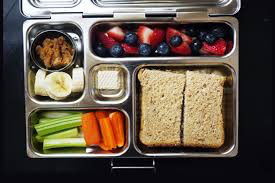
Below I’ve included the list that my kids have used to pack their lunches, as well as some of their favorite combinations
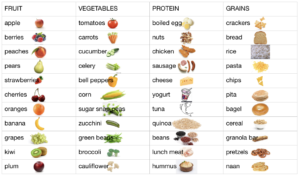
Their favorite combinations are as follows:
- Apple slices, nut butter, tomatoes, and granola bar
- Hard boiled eggs, cereal, bell peppers, peaches
- Tuna, crackers, cherries, sugar snap peas
- Yogurt, berries, zucchini, rice sprinkled with cinnamon
- Quinoa, pears, carrots, pretzels
- Grapes, cucumbers, hummus, naan
Most of these items are kept on the lower shelves of the fridge and pantry so that they are easily accessible. I have the kids make their lunches either after dinner, or while I’m cooking dinner. That way they can use up any leftovers, or, if we’re having noodles or rice, they can get a little scoop before any sauce is mixed with it. Worst case scenario they have to make lunch in the morning and we’ll eat breakfast in the car on the way to school. They also have a separate cupboard for all of their lunch containers, so that they can easily make their own lunch with minimal help from us.
As our kids have gotten older, like most kids, their food quantities range from “constantly grazing” to “picky minimalist”. The amount of food they pack in their lunches has always been up to them, with a firm minimum of 1 serving from each category. If they’re eating more, they can certainly have more from each category, with a few exceptions from the grains category. We’re not going to let them head to school with 1 blueberry and a double serving of pretzels. They have a fairly decent idea of how hungry they get at school and will pack accordingly, especially as they get older. Putting minimums helps the younger ones as they start recognizing portion sizes.
Whatever you can do to make it easier for them to pack a healthy lunch, and keep yourself a sane parent, do it! You’re providing the healthy choices, they’re choosing how much of each they’re going to eat, and there is less wasted food and frustration.